Wednesday 20 January 2010

Five Coat - outer pockets and skirt

Today I am going to complete work on the outer pockets.

These pockets are very different from the usual welted ones I have come accustomed to doing my Tennant Coats.

So far I have made the flaps for the outer pockets and sewn them in place on the waistline seam (see right).

The next thing I need to do to make this unusual pocket, is sew the back of the pocket bag, made up of a pocket facing (so if glimpsed, the inside of the pocket looks like it is the same material as the rest of the coat) and a pocket bag made from silesia, a durable cotton material commonly used for just this purpose (see left, top).

The pocket backing gets sewn flipped upwards on top of the pocket flap.

When this is put on my tailor’s dummy you can get an idea of how it is working (see left, bottom).

I then need to sew the front part of the pocket bag to the top of the coat’s skirt, matching the position as closely as possible, working from the front edge of the coat (see below, top left).
Then with the pocket bag halves extended out, I match up the skirt and body of the coat and sew only an inch or so either side of the pocket to establish its width (see below, top right). This give me the chance to quickly check I am sewing the waistline seam at the right level.
Happy that it is okay, I finish sewing to the front of the coat on one side, and to the back on the other.


To finish the pocket I need to now sew the pocket bag itself.
It is very important to start precisely at the end of the waistband seam I have just sewn. Access to this is made difficult as all the other layers of fabric bulk together above it, preventing the foot of my sewing machine to get close enough to sew.
To get round this I use a clever, but simple gadget I picked up ages ago and have hardly had use for. It is intended to help sew seams on jeans and is a thick plate of plastic with a slot in it which you put around the needle of the sewing machine (see above, bottom left). This then takes the weight of the machine’s foot and raises it to the level of the bulky work you are approaching. The foot then effortlessly glides off the block onto the bulky fabric and can continue sewing without stopping, but for what I need it helps me get right on top of where I need to sew. I can then turn and stitch the rest of the pocket bag (see above, bottom right).

That finished the pocket off and the result looks very good (see below, left). The trick I pulled when I made the Pocket Flaps to prevent their corners curing is working a treat (see below, right).


I then need to set the rest of the skirt in place, finishing the waistline seam at the back before continuing the seam line from the back curved seams right down to the hem. I had deliberately left this seam unfinished when I assembled the back, so that blending this panel in would be easier when I got to this stage.

And that, amazingly, that finishes work on the bulk of the body of the coat.
I need to move onto the lining next time, with its inside pockets, before rounding off the coat with the collar/lapels and the hem.

Saturday 16 January 2010

Five Coat - making outer pocket flaps

Today I am going to make the outer pockets for the Five Coat.

To start with I need to make the pocket flaps, which need to be lined and piped before setting.

At first glance they are a very simple design – just a simple rectangle that will be sewn in place – but there are a couple of tricks I need to use to make sure they sit nicely and stay that way after the coat is finished. It may seem like I am making a mountain out of a molehill – how difficult can it be to sew a pocket flap? – but done properly they will look great; done badly they will look awful.

The main problem to overcome is the curvature of the body of the coat. If I just make flat pocket flaps and sew them in place, the curve of the body will pull on the fabric. The topside of the flap when then have to span a fractionally longer distance than the underside, and this will cause the corners to curl up and away from the coat. This may not be immediately noticeable when the coat is made, but as things setting down it could become more pronounced.

I will use a simple trick to stop this, based on how I make Lapels And Collars sit nicely.
Once I have interfaced the topside of the flap, and cut a piece of lining to match, I pin them together with four pins, one at each corner. The are positioned with their points towards the corners, and are pinned specifically from the lining side. This makes the corners curl upwards (see right, top) and will counter the pull I described earlier.

I can then sew them together, from the lining side with pins on top. Usually you remove the pins as they get closer to the needle, but to sew the curl into the flap I need to leave them in place (see right, middle).
This is why I put the pins with points towards the corners, so if I accidentally pit the pins with the needle, they will cause minimum damage compared to hitting a pinhead.

I then need to carefully clip the corners to prevent bulking at the points, but leave a little more than usual becasue of the delicate nature of the silk lining (see right, bottom).

Once the pocket flap is turned right-side out and pressed, it has a natural tendency to curl at the corners, but in the direction I want them to (see below).


Time now to pipe the edges.

When I did the Calico Test Coat I needed to make it fairly quickly. I therefore cut a few corners here and there, knowing I would do them more carefully when I did the finished coat. Piping was one thing I needed to make short work of.

I therefore machine stitched the vast bulk of it, with the expectation of needing to hand stitch it all later. However, the results were surprisingly good and I found I could machine a majority of the long straight runs, and hand stitch just the details such as ends and changes of direction. These details give the impression of hand stitching throughout.

So, to pipe the flap I first wrap the piping around the long bottom edge, making sure it is perfectly lined up above and below. I can then stitch, starting and stopping around an inch from the corner (see left, top).

Once this piece is secured in place (see left, middle) I can the do the same on the sides, gently bending the piping around the corner.

The piping then has a bulge (see left, bottom) which I can hand stitch together to make a nice neat corner.

The finished flap, ready for setting, still has its nice curl (see below).


The flaps are then sew in place along the line of the waist seam of the coat (see below). I need to be careful of the level I am sewing to, as later on this will form the datum for the waistline seam.

The pockets need to be positioned surprisingly far around the body. When I made the Calico Test I found I had placed them too far forward, with the flap not as big as it needed to be. All of this has been fixed for the final version, proving the importance of producing a sample garment before launching into the real thing.

At this point, with the sleeves set and the pockets flaps with the piping in place, the coat starts to take some recognizable shape (see right).

The final assembly of the outer pockets is a little unusual – at first glance quite simple – but surprisingly difficult to execute in practice.

Pop back soon to see how I get on.

Five Coat - Setting sleeves

Over the past few month I have been setting a lot of sleeves on various projects, from Tennant Coats to my Burgundy Tennant Suit. Each sleeve, however, does need to be handled a little differently, as the weight of fabric can effect the finished result.

As usual though, I need to create the roll of the sleeve head, and encourage this to happen by sewing three parallel lines of stitching using an extra strong thread (see right). The ends are tied together and the fabric is then gathered a little like the top of a curtain, but stopping just as small pleats start to form. This give the right amount of ease when the sleeve is set.

To give the sleeve head proper shaping I add a standard suiting shoulder pad on the top-side of the sleeve seam (see below, left) and a minimal amount of sleeve-head padding on the under-side of the sleeve seam (see below, right).


This gives just the right amount of shaping. Below are some images of the sleeve head during it sewing, from the sleeve lightly pinned in place (see below, left) to the sleeve sewn, but not padded (see below, centre) and finally finished with the padding (see below, right).


Now I’ve set the sleeves I can add the buttons on the backs of the cuffs. I waited until the sleeves were on because I want to make sure I get the buttons in just the right place so they are positioned correctly.

I need to space the buttons evenly, so I found the best way to do this was to carefully mark a line on the inside of the sleeve to determine their alignment, then mark their individual positions along the line (see right, top). I then stitch them from behind and they are perfectly spaced.

Lastly, because the buttons are closely spaced and not stress bearing, I use a single thread of cotton daisy-chained between them to save time. A quick knot at the start of each button sewing ensures the tread does not put too tight.

That finishes the sleeves for now (see right, bottom), until they are lined later.

Next will be the outer pockets and the skirt of the coat.

Tuesday 12 January 2010

Five Coat - Assembling the body and sleeves

Having prepared all the pieces of the coat’s body, I am now ready to start putting it together.

Assembling the main body of the coat is relatively easy, the only real tricky bit is sewing the curved seams on the back. These need to be carefully eased in as the back has a longer curve than the side panel it is attaching to (see right). As you can see, the smaller side panel ripples a lot, so to control it I need to always have it the top.

As a quick check to make sure each panel is coming together correctly, I have put the Calico test coat on my dummy, and lightly hung the new work in place like an enormous 3-D jigsaw puzzle (see left).
Early stages, but things are looking good.

The making of the Five Coat’s sleeves are a little unusual, because of the ring of piping around the cuff.

Usually I would sew the long seam up the back of a sleeve first, then while the work is still flat I can stitch the ease of the sleeve head.

However, I need to disguise the join in the piping in the back seam, so I stitch the front seam first instead (see right), which I press flat.

I had carefully worked out the level of the piping when I cut the pattern for the Calico Test, so I am able to accurately mark its position and pin the piping along its lower edge (see below, top left).

I machine-stitch the lower edge (see below, top right) then fold the piping in half (see below, bottom left) and sew the upper edge to finish it off (see below, bottom right).


I can then sew the long seam of the sleeve. It is critical that the piping matches up across this seam, so first of all I pin the ends of the piping together (see below, left) ready for sewing; I then sew only a few inches of the seam, surrounding the piping (see below, centre); this give me the chance to check I have matched it up accurately (see below, right) before sewing the rest of the seam from cuff to shoulder.


Finishing off my work for today, I fill in some more pieces of my jigsaw puzzle and add the sleeves to the dummy (see below).


It looks a little saggy and the shoulders, but that is because the sleeves are not even sewn in or padded.

That will be my next job.

Five Coat - cutting and preparation

The fabric I spent what seemed like an eternity to find has arrived, so work can finally start on making the final version.

First thing to do is all the cutting out and preparation ready for assembly.
One of the things I’ve learnt at college, as well as in my own experience, is that it pays dividends to have as much preparation done before starting any sewing. The number of times I have ground to a halt because I haven’t interfaced a crucial piece of fabric doesn’t bear thinking about.

When cutting out, unless you have a predetermined cutting plan as for a commercial pattern, it’s always best to layout and cut the largest pieces first, and then fit progressively smaller pieces around them. So first I cut the backs and the skirt panels (see below).


You may notice I am now using some curious long grey things with handles. These are Cloth Weights and are used to stretch the pattern piece out while cutting and to prevent any unintended movement of fabric or pattern. I first used them at college and found how good they were, so I had to get myself at set – at some expense – but well worth the investment.

Next I cut the fronts, side panels and sleeves (see below).


Then I need to prepare the front panels ready for putting them in place. The upper chest is built up with layers of scrim (a coarsely woven hessian) and felt padding, as well as iron-on interfacing to stiffen the body of the coat.

I have marked all the positions of the pieces on the pattern piece, so use this to get them correctly aligned on top of each other (see below, far left).
The layers being the interface on the bottom (glue-side down); the scrim on top; and the felt padding on the very top (see below, centre left).
All of these layers are sewn along a single diagonal line just under the fold-line of the lapels (see below, centre right).
This is then carefully ironed onto the back of the front panel (see below, far right).


The benefit of doing it all this way, means the upper chest support is firmly sewn to the fronts, but no stitching shows through to the outside, since the stitch only goes through to the interfacing.

To demonstrate the support the interfacing gives, I took a photo of the front before anything was added to it (see right). I then took a similar picture after I had finished work (see far right). The lapel is already wanting to roll at the right position.

You don’t need me to tell you how striking the difference is!

Over on the Tennant Suit Blog in the entry Interfacing On The Inside, I explained that interfacing comes in Light-weight, Medium-weight and a Heavy-weight versions that determine the resulting thickness; and each then comes in either a Standard or Ultrasoft option, which controls it’s drape and flexibility.

The fabric I am using, as you can see from above, is quite limp, so I will need to interface certain parts of the coat to get the result I want.
I don’t want the Five Coat to become too stiff, so I will principally use the Ultrasoft, though different weights depending on the part of the coat I am working on.

For example, the front need to be relatively firm, so I have used the Medium-weight there; but the skirt needs to be more fluid, so I use the Light-weight for that. 
The sleeves and the back do not need facing at all.


In fact, this can be seen from some of the images of Peter Davison in the original coat (see above). Notice how in this picture, the back of the coat and sleeves are creasing a lot more than the front panels. The creases seem to stop dead at the side seem.

With enough of the body cut and prepared, I can start making the coat up – next time . . .

Sunday 10 January 2010

Five Coat - what’s in a colour?

Right – at long last I am back onto my Five Coat after a bit of a delay, and I have got a feeling of Déjà vu.
It’s colour all over again!

The hold up has been because, stupid as it seems, I have had difficulty sourcing a good beige gaberdine to use for the body of the coat.

This was something I had problems with on the Tennant Coat, and I wrote about it in What’s In A Colour?

The whole time I have been working on the Five Coat I have been searching fabric shops and online retailers to try and find the perfect match.

Now I would have thought this to be a fairly simple task – after all, beige is a byword for dull, safe, middle-of-the-road, easy – need I go on?
beige [beyzh]
noun
1. very light brown, as of undyed wool; light gray with a brownish tinge.
adjective
2. of the color beige.
But it has proved to be a bit harder than I thought.

The problem has been compounded by the need to find a fabric of the right weight and feel, coupled with the right colour. I have found a number of stretch gaberdines in good colours, which boarder on being a jersey material, and not the right thing at all; I also found some great pure gaberdines, which lacked the colour range I needed.

In the past I have learnt to my cost in the past that when you are looking for a specific fabric/colour combination, not to buy the first material you see, because once you get it home and start looking at it objectively you can find that your choice was a bit off.
It is much better to go out without the preconception to come back with fabric ready to cut, but to gather swatch samples and asses their individual merits before returning to make your purchase later.
You do, however, need to put a time limit on this process, otherwise you may return to find all of your choice sold without the chance of new stock being ordered.
I therefore, when following this path, tend to steer towards suppliers with large stocks or known, named brands that can be re-ordered from their manufacturer rather than a distributor.

Now, the problem with trying to match a relatively light and neutral colour like this, where it is neither one thing nor the other is simply that: a strong colour is easier to hit, such as the colours of a Six Coat; but a neutral can have a slight bias of hue to it, be it warm or cold, grey or green.

What is he going on about, I can hear you saying! Surely a beige is a beige?

Well, I have gathered over 25 samples – all of which you could call beige in isolation, but when they are put along side each other, are far from similar.
I also had a friend in the US searching his side of the pond for me, and we both made it our mission to track down the perfect colour. He did rather better than me, I must say.

Throughout this entry you will have notice the boards of samples we have found, and appreciate the variation of colour between them all.
On one of these boards also has the piping I will be using, and a shortlisted range of buttons.

Another factor (though for me it is sometimes irrelevant when you are aiming for the best) is the cost of the fabric. The variation in price can be notable, form over £30 a metre, down to £7 or £8 at the cheaper outlets.

At one point I went to some fabric suppliers on Saville Row, and was quoted over £60 a metre for some gaberdine-like fabric, that was not the right colour anyway.

I also tracked down the company that makes the fabrics used for British Military uniforms. Their prices are very keen and they stock some great materials including worsted twills and coating Meltons, which if not now I can see myself using in the future. Sadly, despite having a colour that was a contender, it was only in a Cavlery Twill, which is a very heavy fabric indeed.

In the end, after going form pillar to post (and finding some superb fabric merchants along the way), the fabric we have settled on has been sourced in Los Angeles, and is on its way over to me as we speak.

I can’t wait to get started!


Wednesday 6 January 2010

S21 trousers - customer review

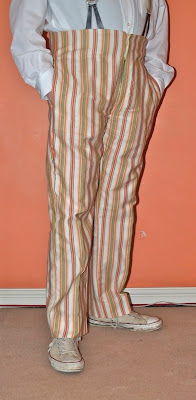
Last year I made a number of Five Trousers,
and one of my clients, Chris, kindly wrote a review of his Season 21 Trousers.
Here’s what he had to say.


The one thing that always surprised me when talking about the Fifth Doctor’s costume was that no-one seemed to be able to notice the difference between his first and last season costumes. To me it was blatent but to most it wasn’t. I had tried to commision other well known costume makers in the past to make the last season trousers but was either told that they were all the same material(!) or that there wasn’t enough interest in them to bother.

You can imagine how thrilled I was when I found Steve on-line who not only could see the difference in the materials but had produced an amazing replica material that looked spot on. Of course I had to have a pair!

Steve was amazing. He took time to keep me informed every step of the way. If there was going to be a small delay I would receive an email explaining why and I felt like I was never in the dark.
 The turn around time on the trousers was amazingly fast, especially for the quality of the finished pair! Feeling a bit like a kid at Christmas, I felt over excited when they arrived and once they were unwrapped, I couldn’t wait to put them on. I was slightly concerned whether they would fit (doing measurements over emails could go wrong I thought) but they were perfect.


Extremely well made and finished with a real professional eye for detail. As soon as I had them on, the DVDs and photos all came out and I can honestly say that they are as near to the originals in accuracy as I think it would be possible to get.

 It’s a pleasure to deal with Steve!


Sunday 3 January 2010

Geronimo!

This week marks the start of a new era: Matt Smith as The Doctor.

It also heralds the start of another unintended project of mine – on as you may come to read, I had no desire to begin.

At first glance, the new Doctor’s costume is somewhat arid of reproducible, unique items, so though I find it interesting (but not to my taste) I could see little I to indulge my sewing skills on.

But as time progresses, the off-the-peg costume he wears has become increasingly difficult to track down, and I have been approached by a number of cosplayers asking if I would be looking to replicate the shirt he wears.

My first thoughts were that it was out of my capabilities, having never made a shirt before.
But I hadn’t made trousers before making my Five and Six Trousers, so maybe I just need to learn.

As a coincidence, the set-learning part of my recent college course covered shirt-making, showing me it was actually a little easier than I thought.

So, I’m up for the challenge . . .

You can start to follow my progress on my new blog:

eleventhdoctorcostume.blogspot.com